EPAO's
- Assigning Standards to Assessors in ACE360: A Comprehensive Guide
- How to Set Up Links to Training Providers in ACE360 for EPAOs: A Detailed Guide
- How to Edit Your Organisation Information in ACE360: A Step-by-Step Guide
- Optimizing Email Notifications in ACE360: A Complete Guide
- Step-by-Step Guide: Using the ACE360 Support Icon to Open a Ticket
- Assigning Apprentice Records to Assessors in ACE360: A Detailed Guide
- How to Search and Filter Apprentice Records in ACE360: A Guide for EPAOs
- Effective Management of Apprentice Records in ACE360: A Guide for EPAOs
- Managing Shared Documents in ACE360: A Comprehensive Guide for EPAOs
- Mastering the Live Record in ACE360: A Guide for EPAOs
- Tracking Apprentice Progress and Achievements in ACE360: A Guide for EPAOs
- Unlocking EPA Component Grades in ACE360: A Step-by-Step Guide for EPAOs
- How to Apply Provisonal Grades and Overall Grades in ACE360: A Complete Guide for EPAOs
- How to Handle End-Point Assessment Resit Requests in ACE360: A Guide for EPAOs
- How to Request Evidence in ACE360: A Comprehensive Guide for EPAOs
- How to Activate the ESFA Certification API in ACE360: A Step-by-Step Guide for EPAOs
- How EPAOs Can Activate their ESFA Certification API in ACE360
- Certification Countdown in ACE360: The Essential Steps
- Understanding Your Certification Claim Date in ACE360: A Guide for EPAOs
- Resolving Certification Errors in ACE360: A Comprehensive Guide
- Managing Certificate Posting Addresses in ACE360: The Complete Guide
Provider's
- How to Set Up Links to EPAOs in ACE360 for LTPs: A Detailed Guide
- Assigning Standards to users in ACE360: A Comprehensive Guide
- How to Edit Your Organisation Information in ACE360: A Step-by-Step Guide
- Optimizing Email Notifications in ACE360: A Complete Guide
- Step-by-Step Guide: Using the ACE360 Support Icon to Open a Ticket
- Creating Apprentice records in ACE360: A Complete Guide for LTPs
- Bulk Uploads in ACE360: A Comprehensive Guide for LTPs
- How to View Apprentice Records as an LTP on ACE360: A Step-by-Step Guide
- Guide to Assigning Apprentice Records to Users on ACE360: Best Practices for LTPs
- How to Apply a Break in Learning to an Apprentice Record on ACE360: Step-by-Step Guide for LTPs
- How to Withdraw an Apprentice on ACE360: Comprehensive Guide
- Changing EPAO
- Viewing and Editing Apprentice Records in ACE360: A Complete Guide for LTPs
- Comprehensive Guide for LTPs: Uploading Gateway Evidence in ACE360
- Understanding the Apprentice Gateway Reminder in ACE360: A Guide for LTPs
- How to Submit for Gateway Approval in ACE360: A Step-by-Step Guide
- Confirming Gateway Readiness in ACE360: A Detailed Guide
- Resolving Apprentice Gateway Rejections in ACE360: A Comprehensive Guide for LTPs
- Certification Countdown in ACE360: The Essential Steps
- Understanding Your Certification Claim Date in ACE360: A Guide for EPAOs
- Resolving Certification Errors in ACE360: A Comprehensive Guide
- Requesting an End-Point Assessment Resit in ACE360: A Guide for LTPs
- How to Raise an Appeal as an LTP on ACE360: A Step-by-Step Guide
- Managing Certificate Posting Addresses in ACE360: The Complete Guide
Scheduling & Booking Tool
- How to Create a Booking as a Training Provider on ACE360: Step-by-Step Guide
- How to Create Draft Bookings as a Provider on ACE360: A Comprehensive Guide
- How to Select an Apprentice for Booking on ACE360: A Provider's Guide
- How to Select Components for Booking on ACE360: A Step-by-Step Guide for Providers
- Complete Your Booking Details on ACE360: A Provider's Guide
- How to Add an Additional Apprentice on ACE360: A Provider's Guide
- How to Book a Venue on ACE360: A Step-by-Step Provider's Guide
- How to Review Your Booking on ACE360: A Step-by-Step Provider Guide
- How to Manage Your Booking on ACE360: A Provider's Guide
- How to Edit Bookings on ACE360: A Provider's Guide
- How to Request a Cancellation on ACE360: A Provider's Guide
- How to Use the Bookings Dashboard on ACE360: A Provider's Guide
- Confirmed Booking Status on ACE360: What Providers Need to Know
- How to Use the Booking Tool Calendar on ACE360: A Comprehensive Guide
- How to Search and Filter Bookings on ACE360: A Provider's Guide
- Mastering Completed Bookings on ACE360: A Comprehensive Provider's Guide
- How to Use the Calendar URL in ACE360 for Seamless Scheduling
- How to Exporting Booking Data from ACE360: A Step-by-Step Guide
- Setup Your Organisational Availability on ACE360: An EPAO Guide
- How to Create Draft Bookings as a Provider on ACE360: A Comprehensive Guide
- How to Create a Booking as an EPAO on ACE360: A Complete Guide
- An EPAO Guide to Choosing Apprentices for Assessments on ACE360
- How to Select Components on ACE360: A Step-by-Step Guide for EPAOs
- Complete Your Booking Details on ACE360: An EPAO Guide
- Add More Apprentices to Your ACE360 Booking Easily: An EPAO's Guide
- Book Your EPAO Venue on ACE360: Streamlined and Efficient
- Review Your Booking on ACE360: A Step-by-Step EPAO Guide
- Effortlessly Manage Your EPAO Bookings on ACE360
- Assign Assessors to Your ACE360 Bookings Efficiently
- Complete Your Final Booking Review Now for a Seamless Assessment Process
- How to Edit Bookings on ACE360: A Comprehensive EPAO's Guide
- Reset Booking Time on ACE360 for Optimal Scheduling
- Cancel Your Booking on ACE360: The Complete EPAO Guide
- Manage Your Bookings Seamlessly with ACE360's Dashboard: A Comprehensive EPAO Guide
- How to Search and Filter Bookings on ACE360: An EPAO's Guide
- Share Your ACE360 Booking Easily with Non-Users: The Complete EPAO Guide
- Confirm Your Booking on ACE360 for Seamless Assessment: The Complete EPAO Guide
- Completed Your Booking Status on ACE360: A Step-by-Step EPAO Guide
- How to Use the Calendar URL in ACE360: An EPAO Guide
- How to Use the Booking Tool Calendar on ACE360: A Comprehensive Guide
- How to Exporting Booking Data from ACE360: A Step-by-Step Guide
- Setup Your Assessor Account on ACE360
- Set Unavailable Dates for EPAOs on ACE360: An EPAO Guide
- Navigate Through Your Bookings: An Assessors Guide
- Manage Your Bookings Seamlessly with ACE360's Dashboard: A Comprehensive Assessor Guide
- View Your ACE360 Booking Details: The Complete Assessors Guide
- Trace Your Booking Status on ACE360 for Real-Time Updates
- Confirm Attendance
- Search and Filter Bookings
Popular ACE360 Queries
- Articles coming soon
Step-by-Step Guide to Creating User Accounts in ACE360 for EPAOs
The next step is to click the Invite Other Users option. Select the Users Tab and click the green”Invite a New User”.

Alternatively, click on the General Settings icon on the menu bar on the left-hand side of your screen and follow the same process. From here click the Users tab and the “Invite a new user” button. Next, simply complete the pop box by inputting the email address and roles of colleagues you would like to invite to the site. Once you have completed the list simply click send an invite.
Remember to click the green plus sign to continue adding users to your list.


Please note, the list of users can be as long as you would like, just make sure to click the plus sign to add a new user that you would like to send invitations to, to the list.
The user roles available within the system are as follows:
- Super Admin – Can set up all types of user accounts
- Admin – Can set up other Admin, Senior Assessors and Assessor accounts
- Senior Assessor – Can only set up assessor accounts
- Assessor – Cannot set up any user accounts.
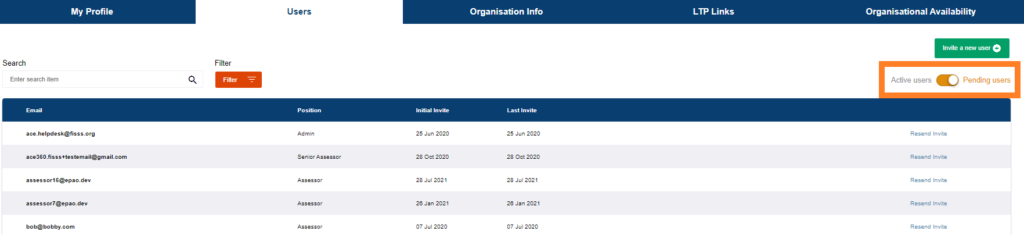
Once all invites have been sent and user roles defined, you’re able to view the created accounts within the general settings icon and users tab. This section will show both active and pending users that are linked to your ACE360 EPAO account.

Once complete, the next step is to add standards to your account.